How to Install a Mercedes Convertible Soft Car Top

TOOL/MATERIALS REQUIRED
Phillips & Slotted Screwdriver --Scissors --Marking pencil or Chalk --Metric socket set.
Blunt stuffing tool(rounded putty knife)--Awl
Spray Adhesive 1 can.  or Brush Adhesive, quart
Pulling wire
Weatherseal Adh. black #9412--Silicone Adh. Black #9413
Protective blankets --Masking tape
Pliers or Vice Grips--Hooked tool


ADDITIONAL PARTS THAT MAYBE REQUIRED
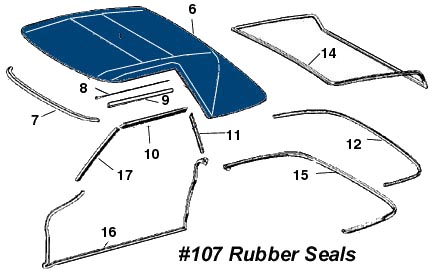
Top Straps, pr. #107-3056 (not illustrated)
#7=Top to windshield weatherseal #107-2196,
#10=Door glass to top frame weatherseal, horizontal #107-2199, 2 req.
#11=Door glass to top frame weatherseal, verticle #107-2200, 2 req.
#17=A post weatherseal #107-2291/2202, 2 req.
#12=Top to rear deck lid  weatherseal #107-2198,
#8=Side cables (pr) 107-2195,
#9=horizontal side seal is included with all STF or German canvas tops
Call for pricing.


Preparation

* Inspect contents of box against your invoice, especially color & material.
* Protect car with fender covers or blankets to avoid damage to finish.
* Tape protection over inside and outside of plastic window on new top.


Pre-Installation

*Protect both sides of plastic windows to prevent scratches.
*Cover trunk & hood with protective blankets
*Unlatch and release back rail & lid.
*Unlatch header bow and retract frame for better access to weatherseals and retainers. 


Top Removal

  • The front horizontal door glass weatherseal and vertical retainer assemblies are removed as follows.
  • With a wedge or flat screwdriver carefully remove the rubber seal from the retainer.
  • Old or deteriorated seals may tear or not seal properly . If replacement is necessary, order #107-2199 .
  • Next remove the seal retainer held in place by phillips screws.
  • The vertical door glass rubber weatherseal & retainer are removed in the same manner.
  • Check the seal for serviceability, if replacement is necessary order #107-2200.
  • Next remove the flat head phillips screw & cup washer lying behind the vertical seal retainer.
  • The vertical flap can now be peeled from the vertical frame member.
  • Repeat the process for the other side.
  • The header bow weatherseal & retainer are then removed.
  • Inspect rubber seal for serviceability, if replacement is necessary, order # 107-2196.
  • Peel the top away from the header bow, pliers will aid in the separation.
  • Remove the chrome screws & cup washers from sides of header bow, these screws are also used to secure the side tensioning cables to the frame.
  • By carefully applying a solvent to the listings, the adhesive can be softened and the listings are then easily removed from the bows.
  • With most of the deck and vertical flaps now free, loosen the nut that secures the side cable and pull the cable from the frame. The back bow listing can now be removed from the frame.
  • Raise the rear frame rail to the vertical position, start the removal of the rubber weatherseal from the retaining rail by twisting the seal inward and away from the rail while simultaneously pulling the interlocking lip from the groove with a hook tool.
  • Be careful not to damage the seal with this tool.
  • The remainder of this step can be completed without the use of this tool .
  • Inspect the seal for serviceability, if necessary replace with # 107-2198.
  • Remove the flap from the rail, begin separation of the two by using the hook and continue by pulling the flap.
  • Pliers may be used if necessary.
  • Clean all surfaces of old adhesive.
  • Inspect top straps for wear or discoloration, if replacement is necessary, order # 107-3056.

    Before installing the new top it is critical that the bow height be checked and if necessary be reset to factory specifications.
    This is especially important on older cars which may have had several replacement tops.

  • This is done with the frame up and the top locked into position.
  • The dimension of the exposed cable between the rear rail and the back bow should be 17 1/2 inches.
  • Readjust the cable if necessary.

    Top Installation

  • Set the new top into position on the car, check that everything is in order and that window and car protection are in place.
  • With the front rail in the vertical position apply contact cement to the underside of the rail.
  • Apply the cement to approximately 2/3 of the channel at each side of the locking pin.
  • Contact cement can now be applied to both the right rear and left rear retainer flaps.
  • The adhesive should be concentrated from the seam to approximately 1 1/4 inches outward on the flap to insure an adequate bonding to the retainer rail will be made.
  • While allowing the contact time to set up and become tacky, a dry run on setting the top to the rear rail should be made.
  • Start by centering the top to the rail.
  • The seam on the skirt of the top is positioned directly on the edge of the rail.
  • The top is pulled around the rail so that the notch in the flap meets the end of the rail, the skirt will flow in a smooth continuation of the rail and meet the body of the car.
  • Fit the skirt along the edge in short segments forming a relatively flush extension of the rail.
  • When satisfied, use a blunt stuffing tool to push the flap into the channel.
  • Using this procedure continue setting the top along the rear portion of the retaining rail.
  • Using a blade or scissors, trim away any excess flap material from the channel.
  • Apply contact to the side sections of the rear retainer flap, both left & right side.
  • Once the cement has become very tacky, set the rear side portions of the top on the rail, remember the notch in the flap goes flush with the end of the rail.
  • Again, once you are satisfied that the skirt is a flush continuation of the rail, place the flap and using the blunt stuffing tool apply pressure to permanently set the flap into the channel.
  • This procedure is repeated for the other side.
  • Again trim excess if is necessary.
  • The key to a trouble free installation at the front of the top is keeping in mind that the front bow and listing stitch are your reference points when gluing the top to the header bow.
  • Apply contact cement to the header bow and front of the top.
  • When setting the front of the top to the header bow begin by straddling the listing over the front bow and make sure the corner is properly positioned.
  • Work your way across the front, keeping the stitch and bow alignment uniform while placing the top to the header bow.
  • Go to the opposite corner, and place the remaining portion of the front to the header bow.
  • Remember the stitch should be positioned uniformly over the first bow.
  • Continue to check and reposition as necessary.
  • Once you are satisfied with the front of the top, install the cable screws in the header bow.
  • Using an upholstery pin locate the exact position in the top that will align the screw with the cable eyelet and the hole in the header bow.
  • Once this has been found, mark the spot and with a punch make a small hole in the top.
  • Pull the side cables thru the pockets with the strings provided. If the strings have been removed, use a wire pull to fish them thru.
  • Put the chrome phillips screw through the screw eyelet, through the top material the cable eyelet and into the header bow. Apply contact cement to the underside of the header bow, at the ends and along the front edge of the header and deck.
  • Once the contact cement becomes tacky use a blunt tool to set the front of the top to the underside of the header bow.
  • Apply contact cement to the underside of the front side flaps and set into place.
  • With the front corners now in place apply contact cement to the outer side of the front side flaps and to the horizontal door glass seal.
  • Allow time for the glue to set up and place the seal into position.
  • When fitting the top under the header bow the excess material is removed by making two relief cuts.
  • The first cut is made along the deck seam and should stop about 3/4 of an inch from the leading edge.
  • The second relief cut will be near the end of the header bow, work the excess material into a pleat.
  • Make the second notch cut leaving about 5/16 inch of material from the apex of the cut to the edge of the header bow, trim the reinforcement as well.
  • Apply contact cement to the pull tab you have just created and pulling it inward toward the center of the header bow, cement the tab into place.
  • Contact cement can now be applied and the remaining front of the quarter glued into place.
  • The front of the top is now ready for final trim.
  • Make sure enough material is left so that unfinished edge of the top underlies the weatherseal retainer and not beyond.
  • The retainer screws should fall about 3/16 to 1/4 of an inch inside the trimmed edge.
  • Re-install the header bow weatherseal retainer.
  • The weatherseal is held into the retainer by an interlocking lip.
  • Using a blunt tool work the seal back into the retainer.
  • Apply adhesive to the end of the header bow and the weatherseal.
  • Press the end of the seal into place.
  • Install the horizontal door glass seal retainer.
  • The weatherseal is interlocked in its retainer with a blunt stuffing tool.
  • Thread the side tension cable through the hole at the top of the vertical frame member, route it around the stud and bring it back through the lower hole.
  • With the pliers, pull the cable taut and tighten the cable stud nut.
  • Cement the pull tab to the vertical member by applying contact cement to both surfaces and pulling the tab tight enough to properly position the binding to the edge of the frame then set the tab.
  • With the upper and lower side corners set, apply contact cement to the vertical frame member and vertical flap.
  • The extra material has been left at the bottom of the flap to bridge the gap between the bottom of the vertical frame member and the body of the car.
  • Glue and fold the material forming a seal of sorts which lies on the body.
  • Trim the excess material.
  • Set the vertical flap into place on the frame using a blunt stuffing tool to press it firmly into the corner then trim the excess flap material.
  • Use a pointed tool to find the hole in the frame member for the flat head screw and eyelet.
  • Make a hole for the screw, install the screw and eyelet.
  • Locate and make the necessary screws holes for the retainer.
  • Install the vertical door glass seal retainer with the retainer screws.
  • Now install the vertical door glass seal, again interlocking the seal lip into place with a blunt stuffing tool.
  • When attaching the listings to the bows, keep in mind that the unfinished portion of the listing is wrapped around the bow first and the portion with the folded finished edge is installed last to provide a nice finished look and avoiding unsightly frayed edges.
  • Protect the top from overspray and apply contact cement to the bow and the unfinished listing edge.
  • When the adhesive is tacky, wrap the listing around the bow and smooth it out.
  • Apply more adhesive to the covered bow and finished edge.
  • When adhesive is tacky wrap listing around the bow in the opposite direction.
  • Smooth out the listing and repeat the procedure for the remaining bows.
  • Remember the unfinished edge is wrapped first followed by the folded edge.
  • With everything else in order the rear retainer can be raised to the vertical position for installation of the rubber seal.
  • Interlock the lip of the rubber seal into the channel using a blunt stuffing tool and work the lip into the channel.
  • Start the installation from the center and work toward the end.
  • Latch the top into position.
  • Use contact adhesive to glue the horizontal side seals which  have been provided(German or STF tops only) in the space between the door glass and the horizontal flap on the top.
  • Remove tools and protective coverings.
  • Check for excess adhesive and clean off with solvent.

    Elapsed time approximately 4 hours. 


  • Where to Order

    www.WorldUph.com


    MercedesConvert.com
     

    .